logiccloud Control
In this section you will find information on installing logiccloud Control under Docker and on creating devices in the logiccloud portal.
Hardware Requirements
Section titled “Hardware Requirements”No matter the way you choose to run logiccloud on your edge device, the following hardware requirements have to be met:
- at least 700 Mhz single core CPU
- at least 500 Mb of RAM
- at least 1,5 Gb of disk space
Create device in the logiccloud portal
Section titled “Create device in the logiccloud portal”To add a new device for logiccloud Control, click on the green + icon and enter your information.
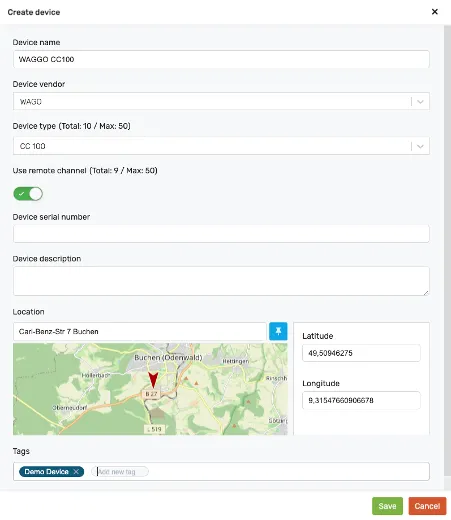
Device name: Name of the deviceDevice vendor: Manufacturer of the deviceDevice type: Type of deviceUse Remote Channel: Selection of whether remote services are to be activated by logiccloud, optionalDevice Serial Number: Serial number of the device, optionalDevice description: Description, optionalLocation: location of the device, optionalTags: tags, optional
Setting up the device
Section titled “Setting up the device”Once the device is created in the portal, you can continue by setting it up on the edge device. Depending on the device type, the procedure might be different, but for standard linux-based devices, you can perform the installation by following the steps presented in the UI:
Opening the device binding dialog
Section titled “Opening the device binding dialog”Click on the bind device button as indicated in the following screenshot:
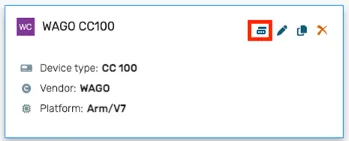
If the edge container is not yet set up, follow the installation steps, otherwise skip directly to the ‘Activation and connecting the device with the logiccloud portal’ step
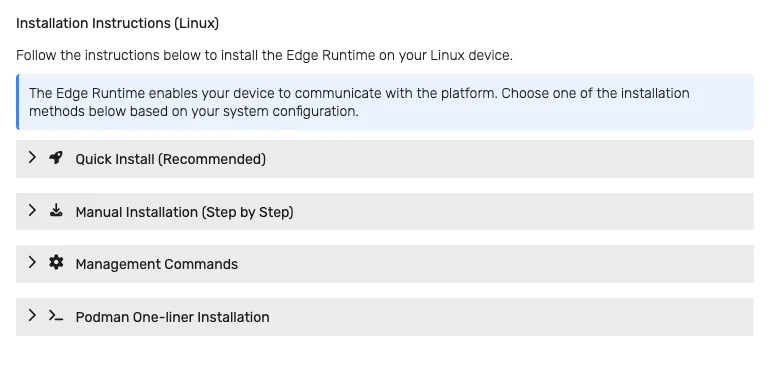
The installation steps are provided in multiple variants:
- Quick Install - this is the recommended and easiest flow. Using
curlorwget, an installation script is downloaded on the device which will perform the installation. The installation process can be customized during the process. - Manual Installation - this process gives more control or alternatives on systems where the quick installation process cannot run due to OS constraints. Besides the manual download and execution of the script using
wgetorcurl, an alternative process can be used to perform this task by using adockerorpodmantemporary container which will perform the download. This can be used on linux OS installations wherewgetorcurlis not available and cannot be installed. The manual process also allows choosing the container technology (dockerorpodman).
Log rotation and disk-wear protection
Section titled “Log rotation and disk-wear protection”During installation the script applies disk-wear protections automatically:
- The container’s
/app/logsdirectory is mounted as a size-limitedtmpfs(--tmpfs /app/logs:size=128m) so in-container logs cannot fill the device storage. - Engine-level log rotation is configured (Docker daemon / Podman
containers.conf) to cap container log files (default 10 MB per file, 3 files).
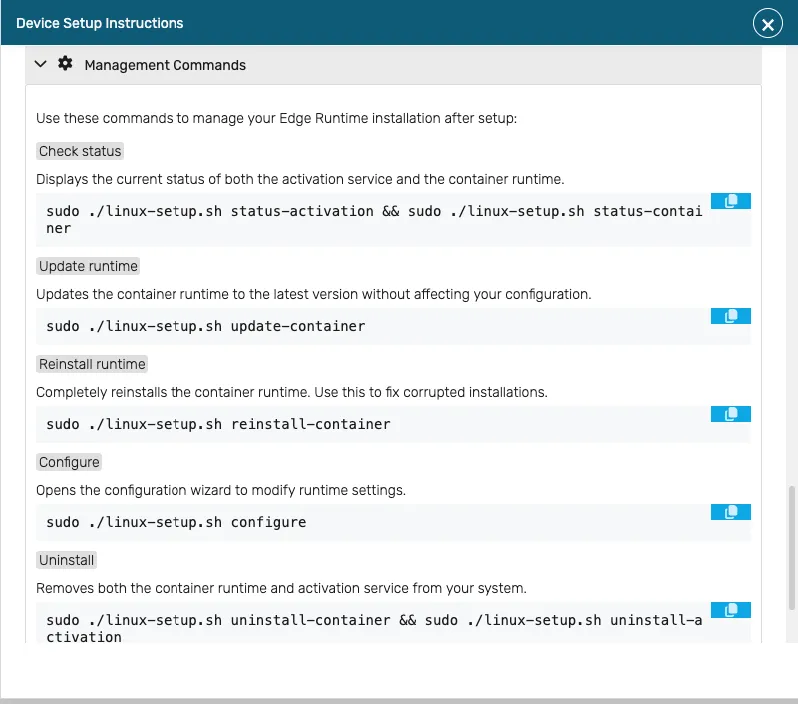
Edge troubleshooting and maintenance
Section titled “Edge troubleshooting and maintenance”The Management Commands section provides various edge commands that can be executed on the device to perform actions such as - checking the status of the installation, performing a container upgrade, reconfiguring the container or uninstalling everything. All these actions can be executed directly on the edge device shell.
Activation and connecting the device with the logiccloud portal
Section titled “Activation and connecting the device with the logiccloud portal”Once the edge container is set up, you can access it by navigating to http://<device or IP>:8080/ in the browser. This will open up the device web interface.
Initially, the device is not connected to the logiccloud portal, so the first step is to perform the binding process. To do this:
1. Copy the token from the logiccloud portal binding dialog:
Section titled “1. Copy the token from the logiccloud portal binding dialog:”
You can do this by either clicking on the copy button, or manually copying the token text.
2. Paste the token in the edge web interface
Section titled “2. Paste the token in the edge web interface”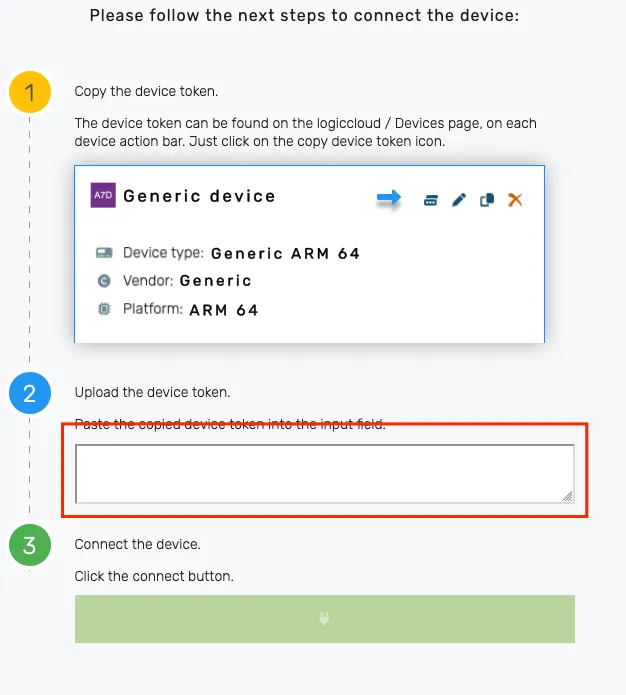
3. Click on the Connect button
Section titled “3. Click on the Connect button”This will connect the edge device to the portal and trigger a background download of the necessary files for the runtime. Once this process is completed, you will be redirected to the edge device login page.
You can now log in with the default credentials:
After successfully logging in, the administrator page opens, and the device information is displayed.
Device overview in the logiccloud portal
Section titled “Device overview in the logiccloud portal”As soon as a Runtime is added, the overview opens: If you assign a runtime without a license key, it is started in demo mode with a runtime of 2 hours.
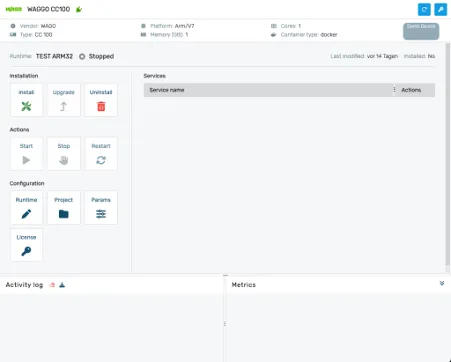
The following sections can be found here:
Device information
Section titled “Device information”The top section displays the device name, license status and device details (expandable by clicking on the ![]() icon). If the device is connected, the
icon). If the device is connected, the ![]() button can be used to remotely reset the admin username and password on the edge device to the factory settings.
button can be used to remotely reset the admin username and password on the edge device to the factory settings.

Actions section
Section titled “Actions section”The left section contains buttons for managing the device:
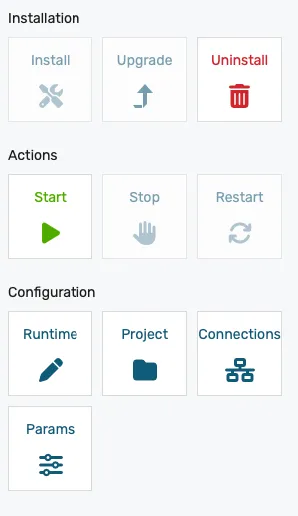
- Installation
- Install - if no runtime is installed yet on the device, the install button becomes green (enabled). Clicking on this button will initiate the download and installation of the runtime and all associated services on the device.
- Upgrade - the upgrade button becomes green (enabled) if any change has been done to the runtime (changing the build or making any changes to the connection configurations). For more details see runtimes.
- Uninstall - will remove the runtime and associated services from the device. This does not remove the actual container from the device. Uninstall returns the device to its post-bind state: the binding to your cloud account, the device-scoped services, and the device’s license/activation state are all kept, while the PLC project, its retained values, and project-specific connector configuration are removed. Uninstall is idempotent — if a previous attempt was interrupted (for example by a power loss), simply run it again to finish the cleanup safely.
- Actions
- Start/Stop/Restart - will start, stop or restart the runtime, respectively.
- Stop affects only the runtime; the device-scoped services keep running. The stopped state is sticky and stays in place until you explicitly start the runtime again. No cleanup is performed, so the project, retained values, and connector configuration are preserved.
- Restart preserves the installed runtime markers, so the device does not need to re-download anything — the same project version comes back up.
- Start brings a stopped runtime back up without a re-download.
- Start/Stop/Restart - will start, stop or restart the runtime, respectively.
The state shown in the portal stays in sync with the device after a stop or uninstall: if the network briefly drops, the state reconciles automatically once the device comes back online.
- Configuration
- Runtime - This provides a quick way of changing the runtime details or build. It is the same action as the add/edit runtime dialog.
- Project - This will open the project associated with the runtime.
- Connections - Quick access to the runtime connections setup.
Device services
Section titled “Device services”The device services area contains a list of all device-level services available on the device and allows installing or uninstalling optional services. Device-level services provide functionality independent on the installed runtime:

- Mandatory services (cannot be uninstalled):
- logiccloud control - this is the core logiccloud control service that provides device management functionality on the edge
- License service - The license service that manages the license associated with the device
- Optional services (can be manually installed and uninstalled using the
 button):
- ctrlX Data Layer browsing service (only available on ctrlX devices) - Installing this service enables remote browsing of the ctrlX Data Layer. See ctrlX Data Layer Browsing for more details.
- OPC UA browsing service - Installing this service enables remote browsing of OPC UA servers located on the edge device network. See OPC UA browsing for more details.
- Debugging service - Installing this service enables remote debugging capabilities for the runtime. See Remote Debugging for more details.
- Node-RED - Installing this service runs Node-RED on the device for low-code flows and IT/OT data bridging alongside the runtime.
- OPC UA server - Installing this service exposes runtime variables to OPC UA clients on the plant network.
Optional services are synced from the cloud. If you enable a service such as Node-RED or the OPC UA server while the device is offline, it is installed and started the next time the device reconnects. Uninstalling the runtime does not remove optional services — they belong to the device, so toggle them off from the Device services area if you want them removed.
Each device service offers a set of actions related to it:
 - restarts the service (required if changing the log level)
 - reinstall the service
 - open the service log. The log output is shown inside a scrollable container that makes it easy to select text, and a copy button (the copy icon, tooltip Copy to clipboard) copies the full log in one click.
 - change the log level
The log level is based on severity/verbosity. Setting a log level will log also entries with a higher severity. The log levels are (from lowest to highest severity):
- Trace
- Debug
- Info
- Warn
- Error
- Fatal
- Unavailable (disabled)
Runtime services
Section titled “Runtime services”The runtime services area contains a list of all services related to the runtime. Depending on the project type and connection configuration, this list can widely vary. At a minimum, the Runtime Service will be installed with a runtime. This service provides the PLC logic processing.

If the HMI service is installed, depending on the device type, an ![]() (open HMI) action button will be displayed in the actions area:
(open HMI) action button will be displayed in the actions area:
- vPLC devices - the action is available in the cloud device management interface
- edge devices - the action is only available when accessing the logiccloud control interface directly on the device.
For each connectivity type, a dedicated service will be installed, which will manage the protocol-specific communication.
The runtime services cannot be restarted or reinstalled individually. They are managed as a whole from the actions section.
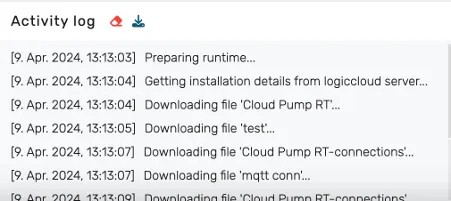
Activity log
Section titled “Activity log”The activity log displays step-by-step progress information when performing actions from the actions section.
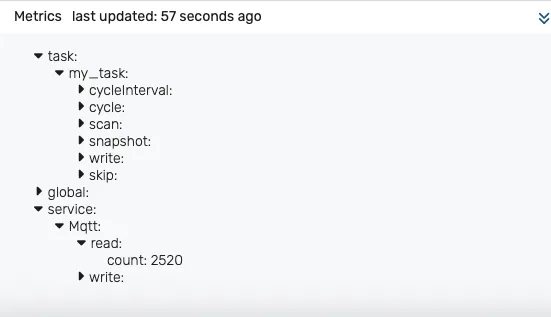
Metrics section
Section titled “Metrics section”The metrics section displays various performance-related KPIs. The metrics are updated every 60 seconds.
- For each configured task, various times are measured during the execution (min/max/average):
- cycleInterval - duration of a complete cycle (including wait time)
- cycle - execution duration for a cycle and number of cycles per minute
- scan - duration of the scan step (snapshotting inputs)
- write - duration of the write-back step (writing outputs)
- skip - normally 0; if this value is non-null, then the CPU is not able to keep up with the cycle interval. The skip number is the number of cycles that have been skipped in the last 60 seconds. This is an indicator that more powerful hardware is required or the cycle time must be increased.
- Global - KPIs related to the performance of the runtime itself
- Service - for each service, KPIs are recorded for the number of reads and writes performed by the service
Alternative installation possibilities
Section titled “Alternative installation possibilities”Installation via device UI
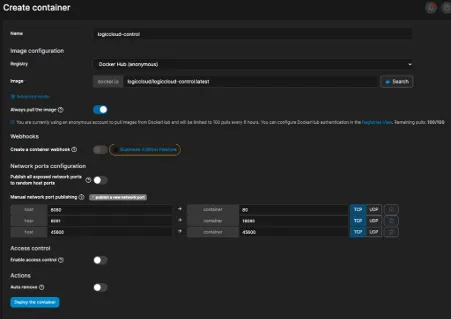
Section titled “Installation via device UI”Some devices have their own interfaces via which containers can be installed, or have pre-installed Portainer, for example, so that you can run containers without the command line. You can of course install logiccloud Control here too, you just need to take the following information into account (the exact names may vary slightly depending on the UI):
- Image Name:
logiccloud/logiccloud-control:4.68.11 - Volume:
logiccloud-storage:/app/storage
Shared ports
- Host:
8080: Container80 - Host:
18080: Container18080 - Host:
45600: Container45600(optional)
Restart policy: always
After installation, the logiccloud Control web interface can be accessed via <DEVICE IP>:8080. Continue with connecting device and activating logiccloud Control.
Installation via Portainer
Section titled “Installation via Portainer”You can install logiccloud in Portainer with the following settings:
- Name:
logiccloud-control(example) - Image:
logiccloud/logiccloud-control:4.68.11 - Volume:
logiccloud-storage:/app/storage
Shared ports
- Host:
8080: Container:80 - Host:
18080: Container18080 - Host:
45600: Container45600(optional)
Restart policy: always
After installation, the logiccloud Control web interface can be accessed via <DEVICE IP>:8080. Continue with Connect device and activate logiccloud Control.
Installation via FLECS
Section titled “Installation via FLECS”If FLECS is installed on your device, you can easily install logiccloud Control via the Marketplace. To do this, simply search for logiccloud Control and click on install. As soon as the installation is complete, you can access the web interface via Apps and the Open App button.
After installation, the logiccloud Control web interface can be accessed via <DEVICE IP>:8080.
If one of the host ports is already in use on your device, you can also change it. It is important that the container port always remains the same. For example: 1234:80, 1235:18080 and 1236:45600.
Uninstalling logiccloud Control
Section titled “Uninstalling logiccloud Control”If you want to uninstall logiccloud Control, follow the instructions in the binding dialog, in the Management commands section (recommended).
A manual approach is by running the following commands:
# Show containerdocker ps
# Stop container. Either with the name or the ID. The first 3 characters are sufficient for the ID.docker stop logiccloud-control
# Delete containerdocker rm logiccloud-control
# Delete imagedocker rmi logiccloud/logiccloud-control:4.68.11
# Delete volumedocker volume rm logiccloud-storage